If you are looking for a day hike that will blow you away in New Zealand, the Tongariro Crossing has no competition. With atmospheric, amazing volcanic landscapes and astonishing views-and walking through what feels like the heart of “Mordor” (yes, The Lord of the Rings was filmed here!), it’s a must-do excursion-any nature lover visiting the North Island.
The Tongariro Alpine Crossing is arguably the most visited and challenging trekking pathway in New Zealand, making it an impressive option for a long day out. Everything you need to know to take on the outstanding hiking trail will be included here.
Which route does Tongariro Crossing take?
On the North Island of New Zealand, there’s Tongariro National Park. Turangi is the closest place to it, about 20 minutes apart; Auckland or Wellington can be reached within four hours by road.
Besides being a natural marvel, the mountains of Tongariro possess sacredness to the local Maori people. Also became New Zealand’S first national park in 1894 and was declared a World Heritage Site by UNESCO in the 1990s for its outstanding natural and cultural significance.
The volcanic eruptions have a cultural importance, but it also plays a part in popular culture. Mt. Ngauruhoe, one of the highest peaks within the park, became famous as Mount Doom in The Lord of the Rings movies, attracting worldwide saga fans to see the ground for themselves.
Expectations from the Tongariro Crossing
This grueling 19.5-Kilometer (12-mile) trek is considered to be point-to-point and takes 6 to 8 hours under normal circumstances. It takes you into an area of active volcanic activity, steaming vents, rocky summits, and ancient lava flows to deliver one of the most spectacular experiences of any walk.
The trail is somewhat more challenging. The ascent and descent involve real elevation-gain issues, rising approximately 2,500 feet (765 meters) and dropping 3,700 feet (1,125 meters) on the return side. So get ready for a difficult but rewarding day.
In between are gentle flats through volcanic fields, steep climbs, and descents all together presenting unbelievable views of crater lakes and lofty peaks. It is a great challenge, but no fears; after every tiring climb or tricky bit, you are rewarded with an epic view.
Trail Breakdown: A Step-By-Step Guide
Mangatepopo to Soda Springs (Easy – 1 hour)
This part of the trail is more or less level and not too taxing. You will walk by volcanic rocks and sulfur streams, catching an early glimpse of the famed Mount Ngauruhoe. Towards the end, you will reach Soda Springs, a small waterfall ideal for a quick breather.
Soda Springs to South Crater (Moderate/Difficult – 40-60 minutes)
Now for the challenge! You will face what is commonly known as the “Devil’s Staircase” and climb steeply up to the South Crater. Allow yourself some time to ascend because this is one of the tougher parts of the whole hike.
South Crater to Red Crater (Moderate – 1 hour)
A level trail comes briefly before starting to climb once more. It’s a steep ascent to the summit of Red Crater, and the ground may be slippery, requiring your utmost care. You will be pampered at the top with a spectacular view and the unmistakable red terrain.
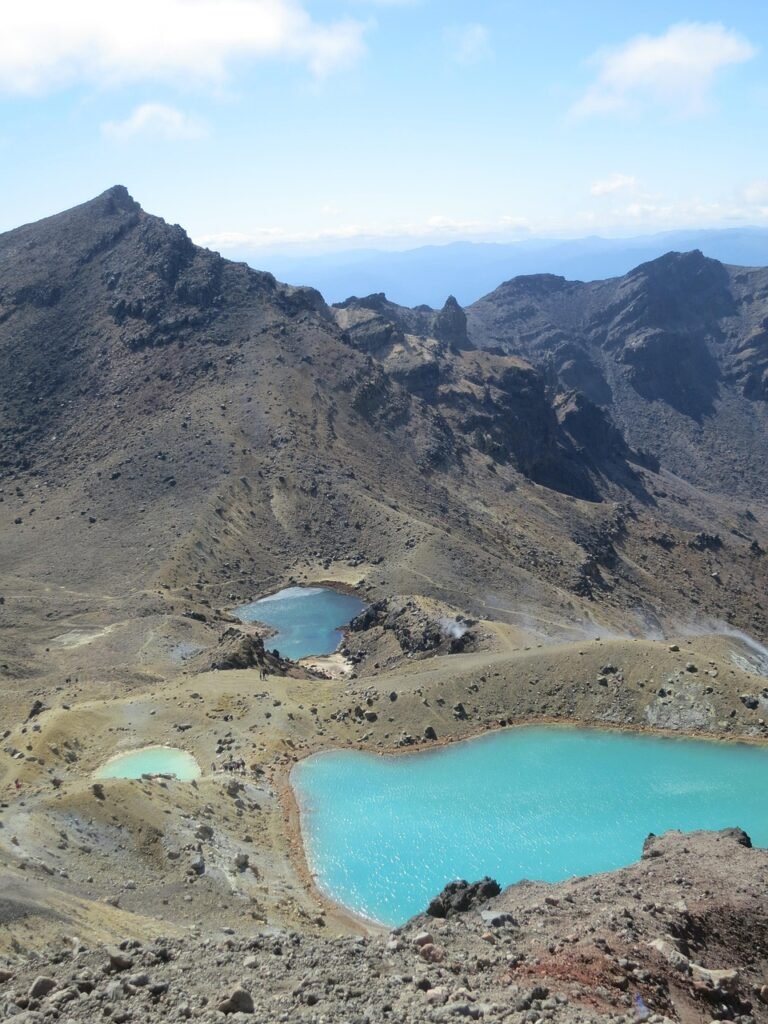
Red Crater to Blue Lake (Easy descent/moderate ascent – 30-60 minutes)
The views from this point are surreal! You can see the towering Red Crater on one side and the famous Emerald Lakes—the glowing green, volcanic lakes—on the other. The descent to the lakes is slippery, so do take care. From there, it is an even traverse followed by a brief uphill stretch to Blue Lake.
Blue Lake to Ketetahi Shelter (Easy descent – 1 hour): This section will be mainly downhill, with an exceptional view over Lake Rotoaira and its surrounding plains. The trail is well-groomed, which adds a little bit of relaxation to this section.
Ketetahi Shelter to Ketetahi Car Park (Easy descent – 2 hours): The last stretch is just a little less enticing as you wander down through the forest. An easy descent, yet it provides a nice visual treat to ease you from the heavier sections of the hike. Eventually, you arrive at Ketetahi Car Park where the adventure ends.
What to Bring:
Water: Stay hydrated with a minimum of 2-litre water for every person: there is no fresh water on this trail, and you will need to carry it all for the duration of the hike.
Snacks: High-energy snacks are important while on a trek. Nuts, energy bars, or just maybe that favorite candy of yours should keep you going because, well, long hikes are pretty much obvious to give excuses for a few sweet morsels.
Footwear: Normal gray gravel ground- pretty tough on the feet while hiking; therefore you’d better wear a good pair of hiking boots that support the ankle. Expect slippery gravel and uneven footing.
Jacket: Take a jacket with you; even though it’s likely to be warm at the lower altitudes, up there it can get cold, so a warm day does not mean that one shouldn’t take a jacket up.
Headlamp: If you are a slow hiker, bring your headlamp along or hike in the early hours of the day so that when it is sunset, you can be back at the place.
Camera: Don’t forget to bring your camera along to capture those beautiful landscapes in very cool photos.. (Just let us remind you that drones are not allowed on this trail!)
How to go Getting to the Crossing The Tongariro route-the centre of it-is a hike that starts and finishes at two separate points. To cover this distance, you would need some transporting system to get you from one end to the other-the easiest way is by taking a shuttle. Leave your car at Aerodrome Ketetahi, take the shuttle and arrive, with hassle-free enjoyment, to get started at Mangatepopo; then, at the end of the hike, you walk into Ketetahi at which point the car will be ready and waiting for you. Available from 5.30 am to 9.30 am, shuttle rides will cost about $40 NZD, about $28 USD for each person. Ensure to book your shuttle in advance, especially during the high-tide seasons.
Ideal Time for Command
The optimum period for hiking the Tongariro Crossing is from November until April at which the weather is generally more stable, and the tracks become mostly clear of snow. Before heading out, always check weather advisories from the Department of Conservation (DOC) because conditions can suddenly change. Avoid hiking in the winter months (May to October) as snow and ice consider the trail unsafe without proper gear and experience.
Accommodation Type
You would want to rest your legs up in the night before the hike, preferably somewhere near Tongariro National Park. Turangi has several holiday parks that could well suit your needs. Or if you fancy something a little more adventurous, try one of the free campgrounds in Kaimanawa Forest Park, such as Kaimanawa Road Campground or Waikoko Valley Campground.
We camped the night before the hike at the free Waikoko Campground: simple but with everything we needed for comfort. Afterward, we slept at a holiday park in Turangi with hot showers and several luxuries included.
Final Assessment
The Tongariro Crossing would probably be one of the most famed trekking trails of New Zealand, as it is not recognized without reason. Dream adventure-challenging reconnaissance by terrific view and, indeed, tread on a most-natured landscape. Just come prepared, as you will need water, snacks, sturdy boots, and a jacket to enjoy this experience unique.